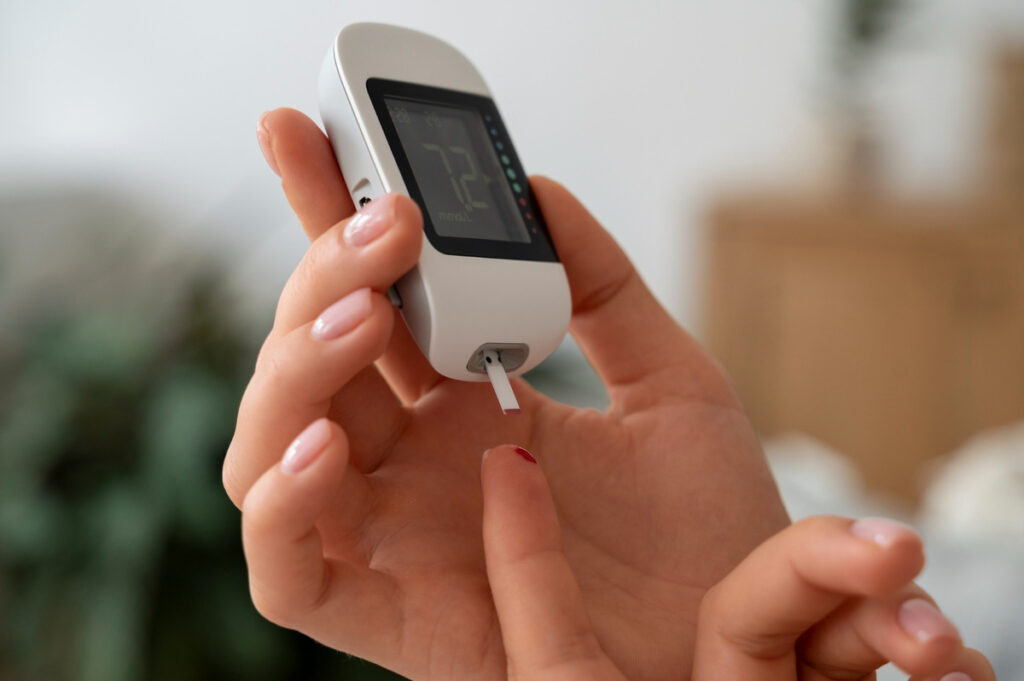
Knowing how to calibrate diabetes meter devices is essential for anyone who relies on accurate blood sugar readings to manage their condition.
Without proper calibration, even the most advanced glucose monitors can produce misleading results that affect critical decisions about insulin, medication, and diet.
In this article, we explain what calibration means, why it matters, and how to do it correctly based on your meter type.

How to Calibrate Diabetes Meter
Understanding how to calibrate diabetes meter devices involves identifying whether your glucometer requires manual or automatic calibration.
Calibration refers to the process of aligning your device’s readings with a known standard, typically using a control solution or code that matches the batch of test strips.
Some older or budget-friendly glucose meters require manual input of a code found on the test strip container to ensure measurement accuracy.
Other models use chip-based calibration, where you insert a small electronic chip into the meter when you open a new vial of test strips.
Modern devices — particularly continuous glucose monitors (CGMs) — may auto-calibrate or only need occasional confirmation with a fingerstick reading.
Knowing your device’s calibration method helps maintain reliable glucose data and avoid treatment errors.
Why Calibration Matters for Blood Glucose Monitoring
Even small discrepancies in blood glucose readings can lead to poor decision-making in diabetes management.
If your meter consistently reads too high, you might take more insulin than needed, increasing the risk of hypoglycemia.
If it reads too low, you may overlook dangerously elevated glucose levels.
Calibration ensures your meter is interpreting strip data correctly under the current environmental and physiological conditions.
It also helps account for lot-to-lot variability between test strips and manufacturing tolerances in sensors.
Calibrated meters reduce the margin of error and improve confidence in your self-monitoring routine.
Types of Diabetes Meters and Their Calibration Methods
Blood glucose meters fall into two broad categories: manual calibration and no-code or automatic calibration devices.
Manual calibration meters require the user to input a code or use a chip that corresponds to each batch of test strips.
This method leaves room for user error — entering the wrong code can result in significant inaccuracies.
No-code meters are pre-calibrated by the manufacturer and automatically adjust to each test strip lot.
These are more user-friendly and reduce the risk of miscalibration.
Continuous glucose monitors (CGMs), such as the Dexcom or FreeStyle Libre, often require occasional fingerstick calibration to verify accuracy, though some models are factory calibrated and don’t need user input.
Understanding your device’s type is the first step toward successful calibration.
Step-by-Step Guide: How to Calibrate Diabetes Meter Correctly
To calibrate your diabetes meter, first read the manufacturer’s instructions specific to your device.
If your meter uses code calibration, check the code printed on the test strip vial and confirm it matches the code shown on the meter screen.
If it uses a calibration chip, insert the chip when opening a new vial of strips — most meters will auto-read the chip data.
To perform a control solution test, shake the control solution, apply a drop to a test strip, and insert it into the meter as you would a blood sample.
Compare the reading on the screen with the range printed on the test strip vial.
If the result falls within that range, your meter is considered accurate.
If it falls outside the range, repeat the test — and if the issue persists, replace the strips or contact customer service.
Always discard expired control solutions or strips, as these can produce false results.
Common Calibration Errors to Avoid
One of the most common mistakes is skipping the code verification step when using a meter that requires manual calibration.
Using expired test strips or control solution can also produce inaccurate readings.
Calibrating in extreme temperatures or with contaminated hands may interfere with the meter’s function.
Applying too much or too little control solution can also affect test accuracy.
Some users mistakenly rely on calibration to “fix” persistent meter errors that are actually due to a faulty device or poor testing habits.
Be sure to follow the meter’s instructions precisely, and replace components as recommended.
When to Calibrate (and When You Don’t Need To)
Calibrate your glucose meter whenever you open a new bottle of test strips — especially if your device is code-based.
Calibration is also advisable when your readings seem inconsistent with how you feel or your symptoms.
Perform a control solution test if you drop your meter or suspect it has been exposed to moisture or heat.
You typically don’t need to calibrate factory-calibrated devices unless your healthcare provider advises otherwise.
With CGMs, follow manufacturer guidelines for calibration frequency and use a clean, accurate fingerstick test when prompted.
Regular meter maintenance and occasional accuracy checks go a long way toward protecting your health.
A Broader Look at Blood Sugar Accuracy
Calibration is a key part of ensuring accuracy, but it’s not the only factor.
Proper handwashing, strip storage, temperature control, and consistent testing techniques are equally important.
Miscalibrated readings can often be traced back to testing errors rather than device defects.
Store your strips in a cool, dry place and close the container immediately after each use.
Monitor expiration dates on all testing materials, and avoid storing your meter in extreme conditions.
Remember that blood sugar fluctuates naturally — one unusual reading doesn’t necessarily mean your device is faulty.
Support Beyond the Meter: Natural Help for Blood Sugar Stability
Even the most accurate glucose meter is only a tool — long-term diabetes management requires consistent habits and metabolic support.
Many people benefit from additional help to stabilize blood sugar, particularly when struggling with insulin sensitivity or post-meal spikes.
GlycoFortin is a natural liquid supplement designed to promote glucose regulation, improve energy levels, and support pancreatic and liver function.
Its carefully selected ingredients include Gymnema Sylvestre, ginseng, green tea, and chromium — each with roles in blood sugar metabolism and inflammation control.
To discover how GlycoFortin can complement your glucose monitoring routine, visit the official site.